|
Flying Polymers |
Polymers are great at flying! Paper airplanes, nylon kites, hot air balloons, polyethylene flying discs like Frisbees, balsa wood gliders, are all made from polymers.
One common polymer that you use every day is used to make paper!
Paper is made of wood pulp, which is formed from the
polymer cellulose. And everyone knows that paper
makes great airplanes!
Now you can make polymers fly. Follow the directions below to make
your own paper helicopter.
| Before you start, follow this link to a larger diagram of the helicopter that you can print and cut out. |
|
|
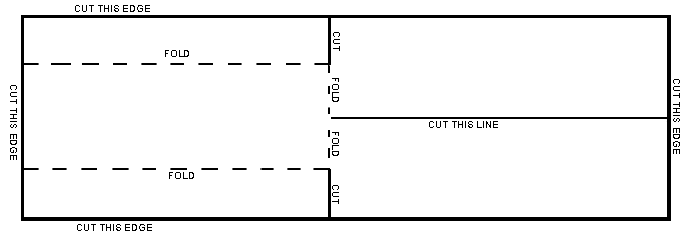
1. Cut out the helicopter
shape and cut all SOLID
lines.
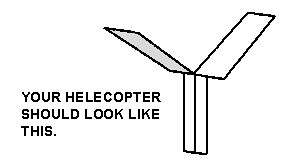
2. Fold on all the dotted lines as shown, with the helicopter blades pointing in opposite directions. 3. Once the helicopter is cut and folded, hold it as high as you can with the blades pointing up, and drop it straight down. |
|
HELICOPTER HINTS:
One way to make your helicopter fly better is to make it out of thicker paper. Also you can put a small paperclip on the bottom of it to make it fly straighter.
Here's another cool paper project. You can make your own pinwheel out of paper,
a wooden pencil and a push pin. Follow the link below to print your pinwheel.
Before you cut it out, try decorating it with crayons.
Before you begin, follow this link to a large diagram of the pinwheel. Then follow the directions to print it out so you can color it.
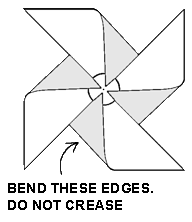 1. After you have colored your
pinwheel square, cut out the
four edges of the square. Then
cut the four diagonal lines from
the corners to the circle in the
center.
2. Find the points with dots on
them, and bend them toward the
dot in the very center. Don't fold
them. Just bend them toward
the center.
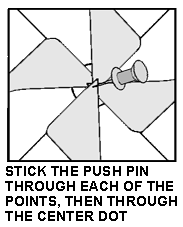 3. Stick the push pin through
each of the four dotted points,
one at a time, and then finally
through the dot in the center of
the pinwheel.
4. Now that the push pin is sticking
out of the back of the pinwheel,
stick the end of the push pin into
the side of the pencil eraser. But
don't push it all the way in.
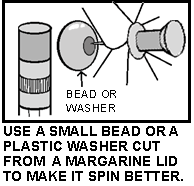 PINWHEEL HINTS:
To help the pinwheel spin better,
try to find a small bead to place
between the back of the pinwheel
and the pencil eraser. Also press
the bends in the pinwheel a little
flatter. Be sure not to crease them.
They need to be open to catch
air. Now blow toward the points to
spin your pinwheel!

|
Return to Just for Fun |

|
Return to Polymers in Action |

|
Return to Macrogalleria |