|
There are two ways you can create tables in Word 7.
- Via the Menu system

As you can see, you will be offered two ways of creating and editing your table: Either by DRAWing the table or by INSERTing a table. More on these options below.
- Using the toolbar

Again, you are presented with both of the above methods.
The Insert Table method

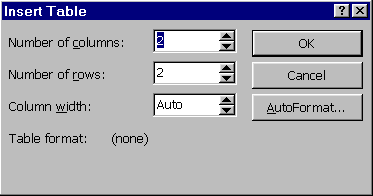
As you can see, you will be offered a default of 2 columns, and 2 rows. Word will also offer to automatically space your columns across the page.
TIP: Do NOT accept these defaults. Change the number of rows to ONE. You seldom know in advance exactly how many rows you require, so select ONE only - since you can create new rows on the fly simply by hitting TAB while in the LAST cell of the table.
Once the table has been created, you can apply the usual shading, font formatting, and hilighting as with any other text. You can resize the column widths by clicking on a column and dragging it to its new width.
Examine the TABLE menu for other options, like inserting rows/columns, splitting cells, deleting rows/cells and so on.
The Tables and Borders method
A far more versatile and powerful method for creating tables is to DRAW or ‘paint' the table onto the page. Select the ‘Tables and Borders' tool (or menu option). Your cursor will change into a pen. Draw the outline of your proposed table onto your screen.

Release the mouse when your table his at the desired size. You now have a single-cell table. Now DRAW within the table to create columns and rows. You can change the line width, colour or format at any time using the table tools which now have appeared on your toolbar set. You can even ‘rub out' a column or row by using the ‘eraser' tool from this toolbar.

Using these tools, you can create tables of arbitrary complexity: Like this... Why you would WANT to do so is another story... :-) |